

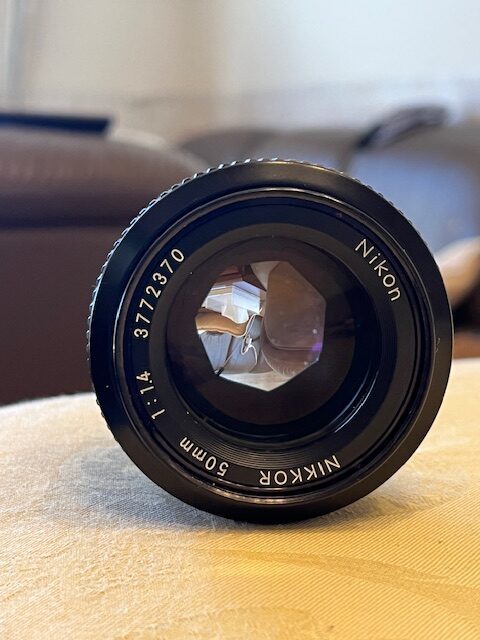
Shot in manual mode with our cheap, wonderful, second hand, 2009 Nikon D40 – acquired by us December 23rd, 2024. It’s an APS-C size DSLR, equipped with a 6.1MP CCD sensor, and our vintage, circa 1976, non-electric Nikkor 50 mm 1:1.4 lens. There is no metering, no aperture display in the viewfinder – we can adjust shutter speed and ISO in the camera’s LCD. The aperture in the lens must be manually focused. We have to play with the aperture, ISO and Shutter Speed; and we think that this is the third or fourth image, but that’s the way the NEF file emerged from the camera. Other than scaling and exporting the image as a smaller file size JPEG – 70 kb or so – there’s no post-production editing. AAMOF, there’s not a one of these images that were “touched up” with editing software, just so you know. Feel free to download the images and check. (We will probably correct some things in GIMP at some point, but this gives you an idea of what can be accomplished. We have been learning to use manual mode – really, “bear-skins and stone knives” technology – read on to see exactly what we mean – for less than a month. Apologies to “Bones” (Dr. McCoy) on Star Trek.) Are we gonna win a contest? Probably not. But after a bit more than a month of trial and effort, it’s been a metric-ton of fun, and that’s really where it’s at. (Apologies to Beck.)
Learn To Use Your DSLR In Manual Mode – The Lone Loon Song Guide:

Thanks for finding us. Thanks for being curious. Full disclosure: We haven’t been at this whole “shoot in manual mode” thing long. About 5 weeks. Well, about three weeks, if we’re to be entirely truthful – because we wasted the first week and a half, and since then it’s been kind of a mixed bag. However, we’ve learned a lot, and we’re happy to share what we’ve learned. This is soooo much fun. Unlike a surprising number of folks you might encounter in your research, we heartily recommend that anyone who is interested in photography give manual mode a try. In addition to the practical benefits; namely, truly understanding the exposure triangle – The side benefit of learning new skills is that it’s good for the dementia. But wait! Don’t order yet! The steak knives! Just kidding.
In addition, it’s given us a boost of self-confidence – not that we had a definite crying need for that. We need that like Noah’s flowers need watering. “Forty days, forty nights… getting pretty damn tired of this …G… Sorry. Precipitation.” The point is: Win – Win. Besides, if we can learn to shoot in manual mode, we feel pretty damned confident that you can. If you can spare a little elbow -grease, you’ll soon find yourself thinking: “it just makes sense, man.” It’s something cool that you can do for yourself, or share with the kids – without spending much scratch. (If you think you might be interested in starting something like that, the camera and lens on the right cost us less than $120.00 CDN, or about ¥120,000. Now, we can’t promise that you will find a deal like that, but we feel pretty certain that you’ll get close.) Here’s our article on How Many Megapixels – Incredible DSLR Cameras For Pennies On The Dollar. That’ll get you started down the road if you’re at all interested in super quality cameras for incredible bargains. In terms of cost-benefit analysis, for our money there is no better bargain in the photography world. We documented our adventure in the article The Lone Loons Go Shopping For Cheap, Old, Wonderful, CCD Sensor DSLR Cameras. We guarantee that if you invest some of your time and effort into learning to use the manual mode, you will not regret it. (We’re so confident we’ll give you double your money back!) We were gonna throw in some steak knives, but that adds a line item to the budget, and we’re the damn Lone Loons! So this is gonna have to do.
We don’t know who needs to hear this, but that’s a joke, son. (Got to keep your eye on the ball. Eye…ball. $0 x 2 = 0. Get it? Foghorn Leghorn – a genius.)
If you want to get started right away, here’s a Table Of Contents (Practical readers should start at #4, but you’ll miss out on a lot of purple prose.):
In A Hurry? Here’s a Table Of Contents:
- Why The Hell Should I Listen To You Loons About Manual Mode?
- Some Benefits Of Learning To Shoot In Manual Mode
- Introduction: Why Should I Learn To Shoot in Manual Mode?
- The Exposure Triangle: (The Lone Loon Version)
- A Three Shot Example Of How We Dial It In:
- A Smidge More On Depth Of Field:
- A Slight Digression, By Way Of Metaphor:
- Why We Learned To Use Manual Mode With Our Wonderful Cheap Second-Hand DSLR
- One Last Short Anecdote:
- Our First Shot That Didn’t Completely Suck
- How To Get Great Photographs In Manual Mode: 6 Easy Steps
- Conclusion
Why The Hell Should I Listen To You Loons About Manual Mode?
AACKXellent question. Whyncha step right up to the front, young Missy, little Master, Sir or Madam? “Got a tale to tell, to listen don’t cost a dime….” (Apologies to the great Steve Earle.)
Because only 5 or 6 short weeks ago, we were you! Yessir, other than being older, better looking and smarter we were absolutely the same as you are now. We were just beginning to learn to shoot our images in manual mode.
There’s a lot of information out there, and we got lost in it. See, a lot of it can be contradictory, confusing, or worse. So after a while, we thought to ourselves: “Selves, we can explain this stuff better than that.” So, this is us attempting to do just that.
Where you are now is where we were a little while ago. There’s a good chance that where we felt frustrated, you’re gonna feel frustrated. But power through it. Hey, we know – during our first two weeks, we couldn’t get bupkis out of this new-to-us camera. Nada. Zip, zilch. Sorry for the technical terms. But, seriously, yeah, what we got either looked like Spinal Tap’s immortal Black Album, (Nigel Tufnel: “It’s like, how much more black could this be? And the answer is none. None more black.”) or as blurred as a 6 year old’s watercolour finger-painting. Disclaimer: We have a huge soft spot for 7 year-old’s watercolour finger-paintings, and the Black Album is a classic, but it’s just not what we were after. You should know that our journey was a lot more difficult than yours will likely be. (That’s because we’re cheap-ass moth …although we bought a wonderful camera and lens, said vintage lens – circa 1976 – wasn’t then, (although gorgeous, and only $60. see photos…) and isn’t now capable of using any electric, or automatic functions. We simply couldn’t see the changes we were making in the camera. There was quite a lot of dead reckoning. (One of our fave Grateful Dead records – not many people agree with us on that one.) Whatever camera you end up using, you’re likely to be able to use your camera’s metering, auto focus, and to see the aperture settings and so on in the electronic view finder. That may well be worth the few extra bucks. We’re the wrong guys to ask, because we effing love this lens, and no amount of bells and whistles will convince us otherwise. So take heart!)
However, in the first week and a half, more than once, we had the damn things back in their bag and ready for the short trip back to the second-hand shop. We are so very glad that we stuck it out. Here’s the good news: this manual mode photography just makes sense. Lots of people will discourage you from trying to learn to shoot in manual mode. We’re not sure why that is. Our advice is to ignore them. Sometimes folks make things harder than they need to be. We did a ton of research, and attempted to distill it down into bite-size morsels, and then serve it up to our friends in our sweet, sweet bon mots. Bon Appétit.
Is learning to shoot in manual mode frustrating? You might use that word. We did. We used a lot of words. An additional unsought benefit was that we discovered we had a deep well of under-utilized profanity in our vocabulary. Plus de grossièreté. At least in the beginning. But if you are lucky and wise enough to have invested in a cheap, wonderful, second-hand DSLR camera, it wouldn’t do you any harm at all to squeeze all of the juice out of your investment. Manual mode will enable you to do that.
At Lone Loon Song, if you know anything about us, you know our raison d’être is getting the best results out of the least investment. In damn near anything. Solar panels. Portable power stations. Chili recipes. Canoes. Name it. As the Japanese say, “nan demo ii-yo”.
In keeping with that spirit, we encourage everyone to explore using manual mode to get the exact images you want. Feel free to bookmark us, link to us, or share us with your friends. We worked hard to make this useful and entertaining, and although we wrote it intending that it be read from the beginning to the middle to the end, this is not always what the reader wants. You’re the boss. If this sounds like something you might be interested in, read on: (if not, use the Table Of Contents.)
Some Benefits Of Learning To Shoot In Manual Mode
- It forces you to think. What gets the focus? What’s important?
- You will really understand the elements of the exposure triangle – which will help you understand when to use modes other than manual, and why you should use them.
- You control everything. Ya think you’re smarter than a camera? Believe us, you are. You think about conditions, and what needs to happen in order to get the image that you want.
- This may not happen for you, but we got a great shot of self-confidence, which translated into everything we do. “Damn Right We Can Learn To Do This. What else you got?”
We have written a longer article on Why Learn To Shoot In Manual Mode, which – if you’re still sitting on the fence about learning this skill – should convince you. The TL;DR is:
It has helped us in all aspects of photography, and as we said, boosted our self-confidence – which is an odd side benefit, and yet totally welcome. But, like all great things one learns to do, it didn’t just fall into our laps. On the other hand, nothing that’s really worth doing every does. Playing the piano, slide guitar, or making the perfect omelette all take some doing. Photography is no different. But we’re getting ahead of ourselves.
This document represents the sum total of what we’ve learned about shooting in manual mode – with images and examples – showing our work – so far. Join us, won’t you? We sure hope this is useful for our readers.
We also did some research on how the sensors in these wonderful cameras work, and why we learned enough about it so it’s possible for us to talk about it: Cameras For Camping – How Digital Sensors Work (CCD vs CMOS). That’s the long story short of how we got here.
You might want to look at some of our other Posts, too. (If you’re new to second-hand DSLR cameras, you might find some useful stuff there. One awesome resource that anyone interested in second-hand cameras or vintage lenses or really – photography, full f-stop – Ahem – ought to check out is Photosynthesis.co.nz. Remarkable. Warning – Hella time sink. Make sure you have a minute.)
Or, perhaps you’re all up to speed, and you simply want to learn to shoot your DSLR in manual mode. In which case: Congratulations. That makes you what our old man used to call “a smart cookie”. Good on ya. It’s not gonna do you harm enough to add up to shucks, and likely you’ll be really glad you did. Sure, it’ll piss you off some in the beginning. But once you get it, and you will, it’s like finally learning to ride a bike. “How the hell could I not know this?”
Thanks for finding us, and tell your friends if you find this helpful, or better yet, link to us. It helps us to keep content like this flowing. In any event, we’re happy you’re here. With no further ado:
Introduction: Why Should I Learn To Shoot in Manual Mode?
One of the great answers that we got to that question is: It takes longer. Now, stay with us.
We have a longer article (We do, it’s Why Learn To Shoot In Manual Mode?) that really goes into the depths on this, but since you’re here, we’re probably preaching to the choir.
Shooting in manual mode forces you to slow down, and think about what you want. “This is great, but it’s too fill-in-the-blank. What do I do? How can I fix this?”
You’re gonna get fewer photographs, but you’re gonna be happier with the ones you get. Actually, the best, truest answer we got was:
“Because it’s gonna make you a better photographer in all modes, not just manual.”
That ought to be enough for anyone. But, in case it’s not, here’s another thing to keep in mind:
Unlike us, you probably have the option to shoot in other modes, and there will definitely be times when that’s the right approach to take. Being cheap as a church mouse frugal, we got the best quality for the least outlay of simoleons. (That’s kind of a thing with us Loons. We make no bones about it. It works for us.) There are a lot of wonderful photographers whom we respect; several professionals among them, and they often shoot in other modes all the time. Whatever mode’s right for the image you’re trying to get. Nobody cares what mode was used. It’s the image. But a knowledge of manual mode can help you make the right decision quickly. Not a soul in this world can tell you that. Nobody can really teach you how to ride a bike, or play slide guitar, either. They can help you, point you in the right direction – but at the end of the day, it’s you touching the strings, or steering the cycle. We have an article that lays out all of the reasons of why you should learn to shoot in manual mode, but for now, let’s get busy learning the how of it.

So, there’s a lot to talk about, and that manual mode ain’t gonna learn how to use itself. First, we have to learn about the exposure triangle:
The Exposure Triangle: (The Lone Loon Version)
There are more articles on the Exposure Triangle on the web than you can shake a stick at. However, in our opinion, none are as concise and as easy to understand as this one. As the great Steven Wright points out: “Copy from one person, that’s plagiarism. Copy from lots of people, that’s research.” We’ve taken some pains to figure it all out, and explain it as simply as possible. But no simpler. Our North Star: Goldilocks.
What we have found in our research (and more to the point – what works in our practice – and practice is vastly more useful than research, at the end of the day) is that a lot of explanations make the exposure triangle more complicated than it needs to be. The literal translation of Photography is some variation of “painting with light”. Well, yeah. But there’s more. It’s really about time, light, and balance. Too much time? You’ll have some blur. Or overexposure. Too little time? It’s going to be dark. Too little light? You can’t see a damn thing. All three of these elements control both time and light, which is to say: exposure. Once you really understand that changing one element requires a change in another, you’re good to go. Ever built a three-legged-stool? The trick is in the balance. adjusting things back and forth. Checking. Thinking. Adjusting. It’s more than simply cutting your legs to length. The magic is in balancing the elements. And then refining their relationships to each other. But in order to do so, you need to internalize how they work together. That takes practice. It takes patience. But so does every-damn-thing else worth doing. Think about it: everything that is now easy, once seemed impossible. Riding a bicycle? See what we mean? So jump on in.
This triangle is comprised of three elements, all of which contribute to the amount of light – or the exposure – of your image. They are, in order of importance – from most important to least, in our opinion:
- The Aperture. This is the size of the opening in your camera’s lens. In addition to how much light comes in, it controls how much of your image is in focus, or depth of field. (It’s easier to show than to explain, and easier to see. We’ve got some examples for you.)
- Shutter Speed. This determines how long your shutter remains open. In addition to light – slower means more light coming in, faster is less – a fast shutter speed makes for clean, sharp focus. (This was a little tricky for us – it’s measured in seconds, or fractions thereof, but in our Nikon, although there is a circle that visually shows how much or little time the shutter is open, it’s non-intuitive – or at least it was for us. AAMOF, the first image we got that didn’t suck was an accident – we were just screwing around with the shutter speed, not knowing really what it did. We had a giant blur issue – and we were just frustrated enough to keep clicking, fooling around, clicking, and POW! (It was much, much more difficult for us, because with our vintage lens, we couldn’t see what we were going to get until we checked it in the LCD, afterward. We probably wouldn’t recommend starting with a vintage, non-electric lens, but that truly worked out for us, and helped us a lot at the end of the day.) The point is, if we can do it, under these circumstances, you can do it. You’ll see it later, or you can have a quick peek now, just to keep your spirits up: Our First Shot That Didn’t Completely Suck.) Your back button ought to bring you right back here.
- ISO. This number indicates how sensitive the sensor (or film) is to light. Most cameras will have a range of 100 – which is for bright situations – to 1600 or more for low-light situations. But, higher ISO numbers will bring noise – which is like a visual distortion – a kind of fog that has no business being in the image. (Again, it’s easier to see than to describe, and we’ll show you examples of that, too.)
The term “exposure triangle” is telling. All three contribute in important ways to the overall exposure of your image. Once perfectly balanced, boom. Magic. Until then. Not so much. The good news is that with a little practice, you can get pretty good at guessing how much of each element your image requires. And then, oh our brothers and sisters in painting in light, Bob’s yer mother’s brother.
So lets us de-mystify these rascals. First: (Literally, this is where we usually start…Depth of field, deep or shallow? What do we want people to pay attention to? Once we figure out where the focus needs to be, well, that is a good place to start – it may well change, but you have to start somewhere.)
See how we slowed down, and thought? That’s crucial to shooting in manual mode. If we were in auto, or some semi-auto mode, we’d be done with the shot by now, we’d just live with what we’d got. A little thought goes a long way.
The Aperture:
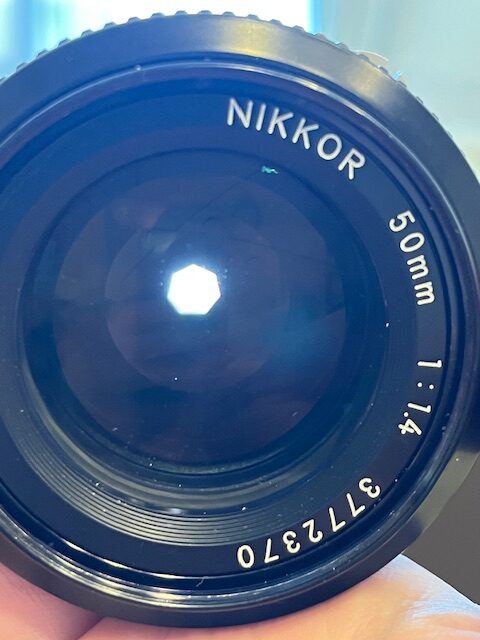
Don’t let the fancy word put you off. It’s simply the opening in the lens through which the light comes into the camera. If you take your lens off your camera, and you look through it, you’ll see that you can open and close your aperture. An aperture has stops. They are measured out precisely. All lenses have ’em. For example, our vintage 50mm lens goes from the largest opening (f/1.4 – although it’s listed on the lens itself as “1.4” – why make things simple? Where’s the fun in that?) through a series of gradually smaller openings to the smallest opening (f/16 – listed as 16 on the lens.)
“Whoa, whoa, whoa, you Loons!” We hear your anguished howl of protest. “You’re fucking it up! The largest opening has the smallest number, and the smallest opening has the largest number? That makes no sense! You iiiiiiidiot, Stiiiiimpy!”
“Yes. You’ve got it.” We calmly reply. Ahem. Carrying on, with no small amount of dignity. That’s how it works. (Don’t worry, everybody has the same initial reaction. Congratulations, you’re part of the gang, now. This small right of passage is behind you.) But back to your lens…
From the largest opening to the smallest opening, our lens goes 1.4, 2, 2.8, 4, 5.6, 8, 11, 16. Yours may well be different, but this will work as an example. (Did you notice the relationship? Every second one doubles the one before last. 1.4, 2, 2.8,4, 5.6, 8, 11, 16 )
That is, 8 different settings. Hold the lens up to your eye and click through the apertures. Notice that you can see that as it goes from the largest opening to the smallest it gets progressively darker. What you’ll most likely hear is that this is very similar to how our eyes work. In low light, our pupils dilate, or open, to let more light in. (Remember letting your eyes “adjust to the light”?) In bright light, our pupils close down, letting in less light.
| Our 50mm lens at f2 | Our 50mm lens at f8 |
|---|---|
 |  |
| The smaller f/number (f/2) is a larger opening. It creates a smaller area of focus (or, a shallow depth of field) and a larger area that is blurred. On the other hand, it lets in more light. Moving it slightly to a larger f/number will not only change the depth of field – making a larger area of focus – but it will also affect the brightness of the overall image. We usually start with the aperture. (Not everyone does. This works for us.) Do we want everything in focus? If so, we want a smaller opening, and a larger f/number. Remember it’s going to darken things down. Easy does it. If you like the way it looks, play with the other elements. (ISO, and Shutter Speed.) | The opposite. A larger f/number (f/8) creates a larger area of focus (or, a deeper depth of field) and a larger area that is in focus. On the other hand, it’s darker. A nudge one click or the other doesn’t make a world of difference, but we always give it a whirl. Once again, make sure you consider the other elements -shutter speed and ISO will play a role. We’ll deal with those in turn. Careful, though. Easy does it, and a darker image is easier to fix in a software editor. Try to err on the side of darker, because too high an ISO adds “noise”, a kind of visual distortion – which is never a good thing. |
So this is all useful stuff to know. But it’s important to remember that it’s only theoretical until you internalize it. It won’t mean anything unless you play with your aperture. Take photographs with it open – that will be f + a smaller number, (f/1.4 for our 50mm lens) letting in more light. (Brighter, like your eyes in the dark.) You should see that brightness in the EVF – or your electronic view finder – once you put the lens back on the camera. Don’t forget to do that. Take photographs with it closed as small as it will go – that will be f + a larger number, (f/16 for our lens) letting in less light. (Darker, like squinting at the morning sun.) Take another photo with the aperture all the way the other way. Take photographs with each f/stop. Look at them, and think about what each needs. That’s all there is to it. As far as the light and the depth of field goes. Unless you’re lucky, you’re not going to get anything worth keeping. That’s okay. The point is to understand how a change of aperture affects the image.
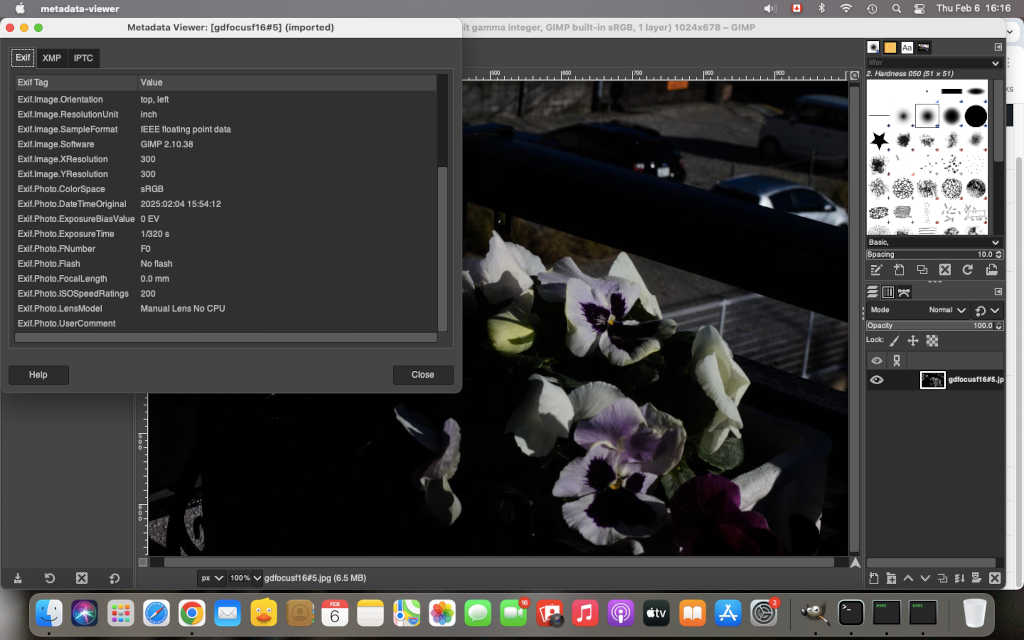
A good way to remember aperture sizes is that apertures are like fractions: A smaller hole is a larger number. 1/2 of a pizza is larger than 1/16 of a pizza. (Take out the 1, substitute an “f”, and now you understand aperture size.) In a kind of “is this going to be on the test?” kind of way. You don’t really understand it, yet. That’s okay. A better way is to take lots of photographs with different apertures and see the results. (Try to remember them. If you can’t – and if you have a modern lens, you’ve downloaded GIMP, take a photograph – as a jpeg – and open it with GIMP, and you can see the ISO, the shutter speed, and the f/number displayed if you go image ->metadata -> view.)
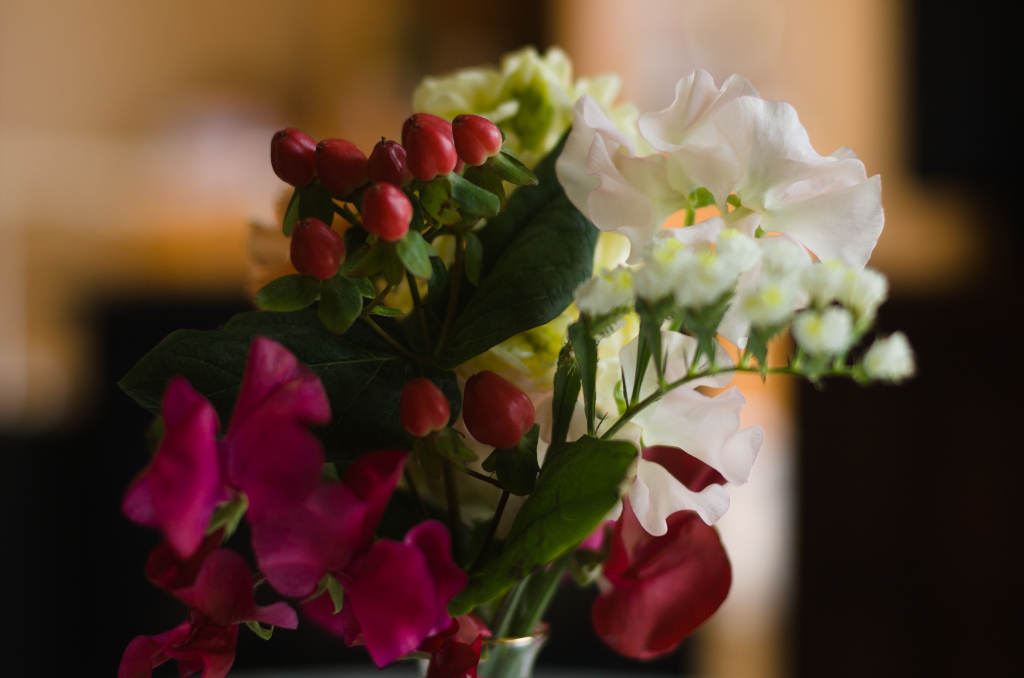
So the aperture doesn’t just control the amount of light getting to the sensor, it also determines the “depth-of-field”. That’s a four-dollar phrase that means “how much of your photograph is in clear focus”. We found it useful to remember that by the phrase: “a large f/number is a small opening, and a large amount of focus”. A small f/number is a large opening, and a small amount of focus. This image of baskets of flowers has quite a large amount of focus.
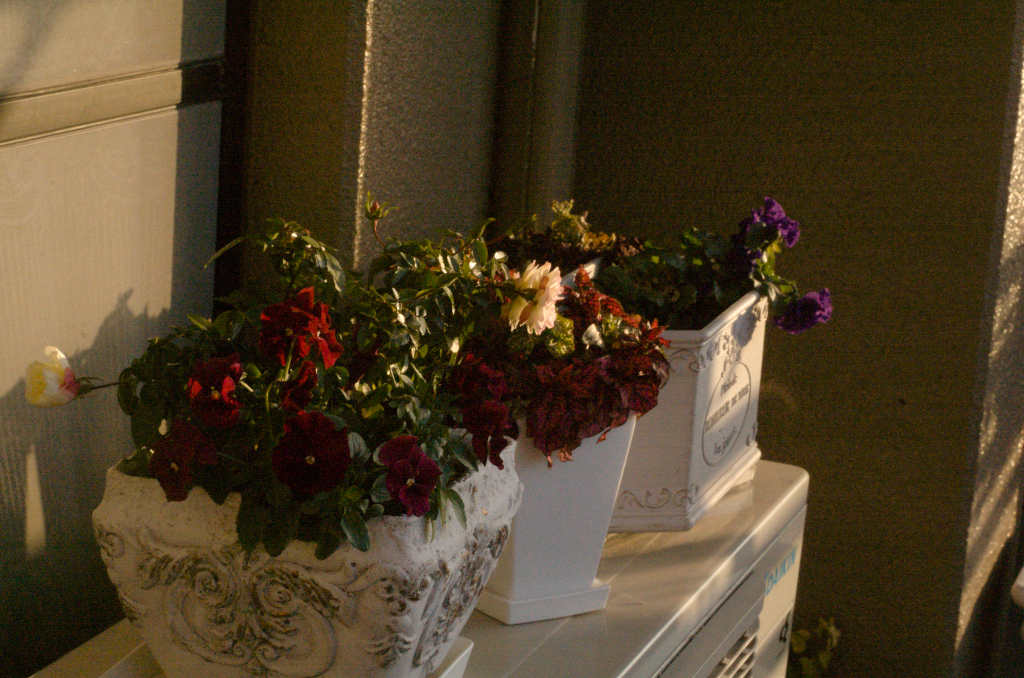
The image below is the opposite. There’s a shallow depth of field, or a small area of focus. We get this by using a small f/number (likely Likely f/1.4, f/2 or possibly f/2.8) which gives us a large opening. You’ve seen this aperture setting used most often in portraits where the foreground and background are blurred, but the subject in the middle is in focus. This image of a flower box is an example of a small f/number photograph where only a little is in focus, and the fore and background are blurred. (Fractions. Remember the pizza? In any event, large is bright, with a large blurred fore and backgrounds and small is dark, with more in focus.)

If you don’t think about it too much, it’s probably easier. Because you’re already streets ahead of where we were a month ago. We thought about it way too much, and it didn’t do us any good. It’s true, thinking is not our strong suit, so we’re in excellent company. (“Just keep thinking, Butch, that’s what you’re good at.” – Sundance to Butch in the classic film Butch Cassidy and the Sundance Kid.)
Just practice. Our “nifty fifty” is a pretty large aperture, yet a pretty small number, at f/1.4 – when it’s wide open, and pretty small at f/16 when it’s (almost) closed. (Remember the pizza? Fractions?) The image above was likely taken at f/1.4, or the next one up, f/2. Again, we’re just guessing. Even GIMP can’t tell us, listing fnumber=0 in the metadata. It also says “Exif.Photo.LensModel Manual Lens No CPU”. But unless you’re just like us, and you somehow lucked into a perfect fucking vintage lens for less than $60. and so you were totally reluctant to return it, you’re probably going to get a lot more useful stuff than us, and those images are going to fall in your lap, once they start coming.
But that’s because our lens is a) ancient, ahem, vintage, and b) made for film – apparently in 1976, and c) non-electric.) And still, we soldier on. The point is, it’s a large opening, letting in a lot of light, and yet a small number. (f/1.4 or 2) That gives us a small area of focus, or “shallow” depth of field. A small opening, with a large f/number will give us far less blur throughout the image and a large area of focus, or “deep” depth of field. Shallow depths of field are what you see in still lifes, conventional model shot portraits and stuff like that. There is a small area of focus, and the rest of the space is blurred. Deep depths of field are what you get when almost everything is in focus, think group shots, landscapes or that sort of thing. Sorry. Too much bloviating. Too much tell, and no show. Let’s us remedy that right now:
Shutter Speed:
The idea of shutter speed, like aperture, is pretty simple. It’s the application of it that takes some getting used to. Very simply, shutter speed means how quickly the shutter opens and closes. It’s measured in seconds, or fractions thereof. For us, a number is displayed on the LCD. If you see “100” that means 1/100 of a second. We tend to use the reciprocal rule, which states that your shutter speed should be higher than the lens focal length. For example, our 50mm lens means that we should never have shutter speed of less than 1/50 of a second. (Our camera is APS-C sensor size – what’s known as a “crop-size”, meaning that it’s smaller than a full frame sensor. Not to get too far into the weeds, but our crop size is 1.5. We looked that up on the web. The formula is focal length x crop size. So, 50(mm) x 1.5 gives us 75mm. So, using this general rule we shouldn’t go below a shutter speed of 1/75. Oh, yeah, once you have internalized these rules, feel free to break them.)
A fast shutter speed is best for “freezing” images, and sharp focus. Think of a strobe light. That’s a good thing to speed up if your image is blurred. (It’s tough for human beings to hold a camera – or anything – completely steady for long.) A fast shutter speed will help a lot with sharp focus. But, like the other elements, if it’s too fast, your image will be dark. We usually start with 1/100 of a second. You have to start somewhere. A typical slow shutter speed would be one of 1/100s, and a faster shutter speed is 1/1000s. Slow = bright, but it could be blurry. Fast = sharp, but it could be dark.
Longer shutter times lead to blurred images. That may be an artistic choice. Sometimes moving water or car lights at night can benefit from blurr. A tripod is usually used for slow shutter speeds. That’s because hand held shots will usually be blurry. It’s mighty difficult to hold anything steady for a long time. So, slow shutter speeds are popular with a lot of folks. We have a tripod, but we haven’t really used it much, so we can’t in all honesty talk much about that. However, we are gonna break that rascal out Real Soon Now™ and see what’s what. Look for a new article focusing on slow shutter speeds.
We’re a little biased, we admit it. We tend to default to a faster shutter speed, because we usually get sharper focus. But, a faster shutter lets in less light, so your image is going to be darker. You have to balance that with the other elements. Or, you can slow it down if it’s getting in the way of your depth of field. Balance the elements. (Do you notice how often we say “balance”?)
If we want a shallow depth of field (blurred fore and background, subject in focus) and the light is good, adjusting the shutter speed to make it faster is a good thing to try. A slower shutter speed is often good for a large depth of field, (everything in focus – like a large group of people or a landscape), but if it’s too slow you often need a tripod, and quite likely to set a timer, as touching the camera tends to shake it. That means blur. In addition, a slower shutter speed means more light coming in, which can cause highlights. So you need to balance that. You need to get rid of some light.
We don’t like to fuss (too much) with the aperture once we’re happy with the depth of field, but an f stop or two larger (f/number but a smaller opening which will let in less light, and darken the image) is something to check out. (A lot of people told us to set the ISO first. That can totally work if you control the conditions – if you are inside, and the lighting is consistent. We tend to be outside in changing light, so it’s less of an issue for us to change the ISO. Depending on conditions, you might want to adjust the white balance. It’s not a nuisance if you get a great image. Make sure you read the manual for your camera.)
The image above used an aperture of f/16 – we set that on purpose, because we wanted to demonstrate – show – a deep depth of field. The problem was that doesn’t let in much light. The first 7 or 8 images were really dark. It’s possible we could have resurrected ’em in GIMP, but they’re in the trash now, and besides, that’s a different article. (Just quickly, darker or underexposed – is nearly always easier to fix if you’re shooting in RAW and want to fix your exposure in GIMP. The opposite – too bright? We haven’t had much luck. Just calling balls and strikes.) We compensated with an ISO of 1600 – which is pretty high. With ISO that high, you’re likely to get “noise” – a kind of visual distortion. We were lucky. So you’ve got to be gentle. Still, this one turned out a juuust a smidge dark. It was pretty overcast that day – late on a January afternoon in Miyazaki City, Japan, so that’s what we got, straight out of the camera. When we’re finished with this, we’ll quite likely fire up GIMP and see if we can make it shine. Look for a new, improved image on a different blog post. Waste not, want not.

ISO:
ISO stands for International Organization for Standardization. We just included that so’s you can be the hero come trivia night. This is possibly the least difficult to understand, and yet we struggled with this.
In photography, ISO represents a sensor’s sensitivity to light as a numerical value. If you have a higher number, that correlates to more light coming in. In low light conditions – overcast days, shade, inside, etc – this higher value will “brighten” your photos. Our first balcony photo (above) started at an ISO of 400 which was as dark as a well at midnight. We erased that one. We just kept going up. Our Nikon goes from 200, 400, 800, 1600, HI1. (Notice that each doubles, and these settings may vary from camera to camera. “It’s tough to say, not knowing.” (Thanks, Kevin!) )
Your camera may well have a lot more options. That’s because, as wonderful as the D40 is, it was introduced at a price-point designed to appeal to novices. (About 10 x what we paid for it.) In order to do so, they didn’t bother with things that a lot of “professional” photographers would pay extra for. Like 100 ISO. Lot’s of cameras that don’t share it’s reputation have lower and higher ISOs, or even the ability to set them by punching in an exact number. (We don’t know if that’s worth it. Maybe it is. For us Loons, you’d really have to show us why we should open up our wallets.) The photo we kept, the ISO was set at 1600, which is really high – we were worried about noise, but we got away with it. We did get a little bit of highlights on the LCD that somehow disappeared when we opened ’em in RawTherapee and then GIMP. You don’t want highlights – bright patches that flash when you look at the LCD. We honestly can’t explain that, unless one of those programs set that back with an algorithm. We’ll have to look into that.
What you usually have to watch out for with a high ISO is for all of that added brightness, you often will get “noise”, especially when it’s getting dark. You’ve probably seen it on phone images; Johnny Bystander with his iphone video taken at night that is shown on T.V. There’s a bunch of little dots that look a bit like fog to us, but have no business being there. It’s a kind of visual distortion. This is an example of what noise looks like if your ISO is too high. That’s not haze. It’s better to use a smaller f/number, (larger opening to let in more light) or slow down your shutter speed. Just tinker with them. Sometimes ISO is the right thing to change. Not in this image.
A Three Shot Example Of How We Dial It In:
Before we begin, one huge thing. RTFM. Read it with your camera in your lap. Play with the settings. Make sure you know where to set all of the elements of the exposure triangle, and the white balance. It will be accessible in slightly different ways depending on your camera – knowing how to set these quickly is the key to learning to shoot in manual mode quickly. You’ve got to slow down to speed up, sometimes. Okay? Okay.
We wanted to be in the studio today, finishing our rock video of Marvin Gaye’s classic, I Heard It Through The Grapevine, but it was not to be. We were tormented by the thought of not finishing this article, which has claimed so much of our time and effort. And unless we get this damn thing out the door soon, who knows how long it will take? (Fucking up our album release date, and causing our valve to do whatever it does. – Apologies to John Kennedy Toole – “A Confederacy Of Dunces”.)
This is a three photograph example of how we like to work. Because we can’t check the metering or f/number in the metadata, we had to fire up the voice memo on the iPhone to make sure of what we got and when we got it. There’s too much profanity, so you’ll never hear that recording. Thank God our Mother is no longer with us.
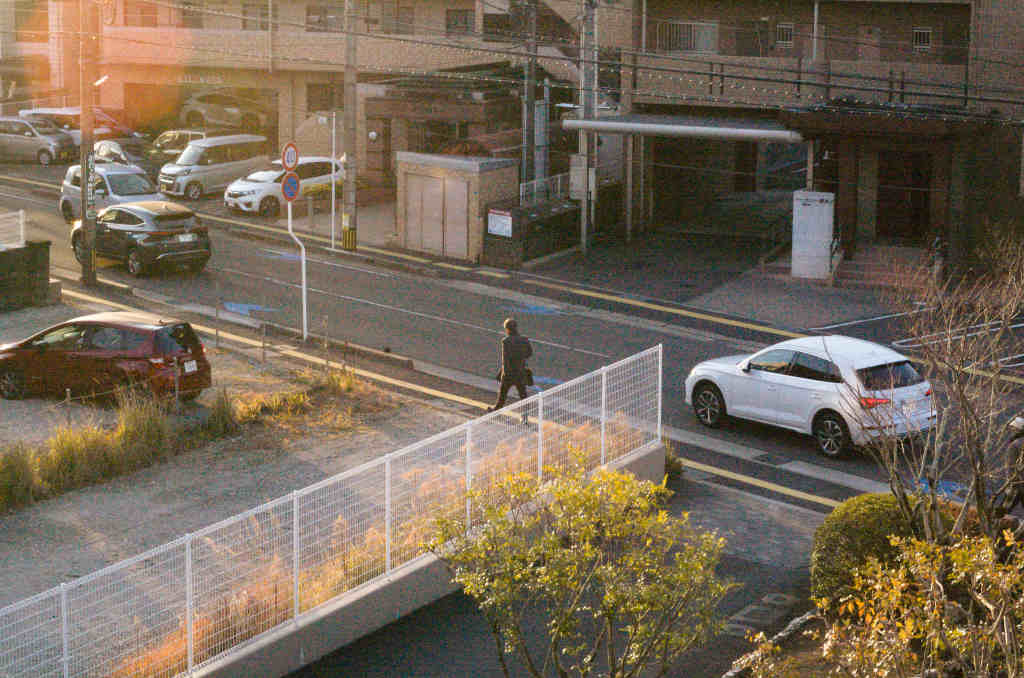
The First Shot.
This was a very bright and windy February mid-afternoon in Miyazaki City. To start, we set our aperture to F/1.4 – That’s far too large an opening, because we wanted a fairly shallow depth of field, blur in the fore and background. This will be too bright. We set the shutter speed to 1/320, and the ISO to as low as it can go – 200. It’s likely to be pretty damn bright, as you might expect to know, in a week or two of good practice.

Loving those colours. But, ask “What’s wrong with this image?” It’s far too overexposed, right? The ISO is down as far as we can go, so how do we protect our image, and darken this down? Let’s try the aperture. We want to tame the light, so we’ll make the opening smaller. Recall that it was f/1.4.
We closed down the aperture to f/2.8, (two f stops smaller – f/2, f/2.8. ) and sped up the shutter speed – both of these changes should make the image darker. (1/1000 shutter speed, ISO still at 200. You see what we’re doing? Test shot, think, change, test shot, think change.)
The Second Shot

Still pretty bright. But we’re getting there. What do we do? We like the depth of field, but maybe we can get away with … juuuuuust a touch …f4
The Third Shot

There we go. F/4, aperture, 1/1000s shutter speed and 200 ISO.
We’re happy with this one. We compromised with the aperture, but we still got an interesting image. It’s a slightly deeper depth of field than we originally wanted, but, it’s still pretty shallow, and we got the exposure and the colours to pop! One thing we could have tried was to have sped up the shutter speed. We had a bit of room to move there. That might have darkened the image a tick, and then we would have the option to re-visit the aperture -open it up to get a more shallow depth of field – and really dramatize the pansies in the middle box.
That’s sort of how the process works for us. If it works for you, great. Feel free to change it up. We think it’s helpful to have a place to start. But there’s no “right” way to go about it. AAMOF, we don’t do it this way every time. If you keep going, you’ll find your way. Take a lot of photographs. “The journey will show you your path”.
You probably have got a much easier camera and lens to work with, but there’s no way you spent $120.00 and got quality like this. In any event, this is the way we like to do it. Every day of practice makes this process faster. Test shot, think, change. Repeat. Repeat until you’re convinced that this isn’t gonna suck. It may well work for you. Give it a whirl.
A Smidge More On Depth Of Field:
Here is another example of an image with a deep depth of field, where (almost) everything is in focus. (Remember, large f/number, large focus.) It’s not ideal, but the difference from the above images should be obvious. There was a bit of highlight flashing in the LCD, but not in GIMP. So all we did was just scale it down and export it as a JPEG.

As we said: We decide on the depth of field we’d like to see, set the aperture – the hell with the lightness or darkness – the exposure – we’ll address that issue later by deciding whether to fool with the shutter speed or the ISO, or both. Hell, sometimes the white balance. (White balance is a series of settings that you can use for different light conditions. With our Nikon we have sample images – representing inside light, and the kind of lighting involved, outside, bright auto, and so on. We usually set that depending on our conditions and change it if we don’t get what we like.) It really depends on the conditions and you, and the image you’re trying to manifest. Feel free to start with another element; for us, the aperture makes the most sense to start with.
The image will tell us which element is number two, but in general, that’s what works for us. YMMV, of course. There’s no “right” way to do this. Your way is the right way.
A Slight Digression, By Way Of Metaphor:
When Covid 19 was upon us, we were in despair. Found ourselves with some time on our hands and so we decided we’d finally quit fucking around and really learn to play the slide guitar. What the hell? We’d been poking at it for lo these 20 years or so, and it always was not quite what we wanted. Well, sir, madam, little Bob and Betty, turns out the secret is the right hand. No pick. Fingers only. The muting. The strings you don’t hear. That takes a long time to learn, it takes a lot of practice. The left hand? That’s all the same. Nothing to it. The right hand is the trick. Nobody does it exactly the same way. Derek Trucks has a different right-hand technique than Sonny Landreth. Ry Cooder has a different right-hand technique than Duane Allman. There’s no right way. But they all have a technique that allows the strings they want to ring, and mute the other strings. Your way is the right way. Here endeth the lesson.
Why We Learned To Use Manual Mode With Our Wonderful Cheap Second-Hand DSLR
Do you want to hear the God’s truth? When we first got our Nikon D40 and our vintage 1976 non-electric Nikkor 50 mm 1:1.4 lens, we had no intention of learning to shoot manually. But God had other plans.
“If you want to make God laugh, tell Her your plans.”
For 4 long, resentment-filled days in the Christmas week of 2024 (which, despite the music and “illuminations” – Christmas means not a goddamn thing in Japan) we were walking past where our cheap, wonderful, second-hand DSLR Nikon with it’s vintage Nikkor 50mm, circa 1976 lens sat on the shelf, and shooting it dirty looks. Hairy eyeballs. (Apologies, and eternal thanks to Arlo Guthrie.)
Furthermore, we weren’t sure exactly how or even if the lens would fit on the body of the Nikon D40. Here’s some advice: don’t force anything. Be gentle. At least with Nikon, all of the cameras will use the same mount. So just be gentle and, with any luck, it’s gonna click into place.
Eventually, we got it on. (Apologies to Marvin Gaye.) And, through diligent research, and active practice we learned to use it with our camera. Other than the photographs of the lens, or the camera were shot with that camera and lens. So, keep the faith, baby!
Since our legendary Nikkor “nifty-fifty” (50mm) lens is not electric, and so the only mode that would work was manual. (We later learned that the metering and some other stuff – aperture stuff in the EVF (Electric view finder) display, mostly – had to be done by dead-reckoning, but that was pretty fun to learn, too. Well, once we learned. It wasn’t all that much fun in the time of the actual learning. You’ll be spared that – that’s pretty specific to our experience. (We’re probably a lot more cheap-ass moth frugal than you, and you’ll quite likely shell out more on a lens that will allow you all to shoot in the other modes. Either way, go nuts. We’re dead chuffed. Do your research and buy quality stuff. That’s what we recommend. We will buy a reasonably modern lens too, eventually – in all likelihood. Perhaps we won’t, we’re really loving this.)
As some of you may know, we at Lone Loon Song are committed to getting the biggest bang for the smallest buck. (All right, you damn grammar schoolmarms – fewer bucks. Sheesh.) Shooting in manual mode was not something that we chose to do. As a matter of fact, we didn’t know what “manual mode” was. We were entirely prepared to take the most common advice we read: “Don’t worry about manual mode – nobody uses that anymore. Might as well take up horse riding, or play an acoustic guitar.”
This adventure was thrust upon us because we (luckily) bought a truly fantastic lens – a 50mm Nikkor from 1976 that had no electrical contacts. We had no idea that lenses had electricity. That was a giant surprise. And consequential. But it worked amazingly well with the Nikon D40, provided you’re willing to put in the work. Anyhoo…
No electrical contacts means that nothing electrical is going to work – no auto focus, and no in-camera aperture display. The instant you switch it out of manual, you’ll get a message saying: “No lens attached.” So, while shutter speed, and ISO is displayed, nothing lens related shows up. And no modes other than manual – forcing us to learn to use the manual mode of our DSLR camera.
Way it shakes out, being forced to learn manual mode was really cool. It was either that, or return our treasures, and we were loathe to do that. Challenge accepted. Basically, our research showed us that we had far too much quality for far too few simoleons. We were unsure if we could duplicate that feat. If you know anything about us at Lone Loon Song, you know that’s basically our raison d’être. We love that more than the Devil hates Holy Water. Church.

(Getting the absolute best for the absolute least.) The hell with returning that good stuff. We thought to ourselves. We decided that if other people can learn to use manual mode, we can too. We reckoned that we’re pretty capable – at least as capable as anyone else. Also, we’ve never been accused of being whatever-the-hell the opposite of stubborn is. Anyhoo…
We have preserved our experience and you can read about our really weird tale – apologies to SCTV – in our article, The Lone Loons Go Shopping For Cheap, Old, Wonderful CCD Sensor DSLR Cameras -“Because a Really Weird Tale is better than no tale at all.”)
Eventually our legendary frugality won out. We decided it was cheaper and better in the long run to learn something useful. You’d be surprised how often we have never found any reason to regret that approach.
One Last Short Anecdote:

On the first day we bought our camera and lens, we got it home and found that it had no SD card, or cord with a usb jack. “How are we gonna get the images into the computer?” we asked ourselves. Back we went to the second-hand store. The guy sold us a card, but he had no cord. He found a local camera shop using Google maps. So, off we went in search of a cord that would run from the camera to our Mac.
In the end, we were convinced by a nice middle-aged guy in that camera shop. His English was perfect. He said, “We don’t have a cord for that. It’s pretty old and they don’t make them anymore. This is a great camera. Don’t return this camera. You don’t need a cord. You need an SD Card reader that goes into an IBM jack. They’re cheap. Here. Buy this one. But keep that camera.”
So, we figured, why not learn to shoot in manual mode? With the card and the reader, we were about $130.00 into this. We’re pretty capable. It was December, and we had some time off. Also, for everyone that told us “Nobody shoots in manual mode anymore.”, we turned up someone else who said, “No, you should learn. Manual is totally worth it.”
Our First Shot That Didn’t Completely Suck
We are so glad we did. Was it frustrating? Hell, Yeah. Did we feel like giving up? Damn right we did. But after 5 days of sheer frustration, mistakes, shitty out-of-focus, over and underexposed photos and research, we got this:

We were astounded. We had no idea what we had done, but something had worked. It wasn’t perfect, but Jesus. It didn’t totally suck. That inspired us. If we can do it once, we can do it again. This is gonna work!
We now – after three weeks – probably closer to a month – have the fervour of the newly converted.
In addition, we’re convinced that shooting in manual mode is the fastest and best way to learn the exposure triangle elements. (ISO, Aperture, and Shutter Speed.) We mean, really understand. Totally internalize them.
Once you have that, you know what to change, why you should change it, and how much of each element to change to get the result you’re after. A lot of photographers we respect include white balance, and metering in their important elements. We’ll have to get a new lens to use metering, and although we use white balance from time to time, we usually check that only if all else fails. (You can always fix the white balance in post-production, though. It’s much easier to fix colour in GIMP, though, provided you shoot RAW files. You can still fix the jpegs, but there’s not as much data in them.)
We’re big fans of the K.I.S.S. method – Keep It Simple, Stupid.
If you learn to shoot in manual mode, you can play with each single element or all of them. You’re gonna take a lot of shots, and all but the last one will suck. Sorry. But there it is. That’s what the trash can button is for. “It’s no skin offa your potato, Larry.”
On the other hand, you’ll really understand how ISO works. You’ll really understand how shutter speed works. And you’ll really understand how aperture works. Most importantly, you will also understand how they work together. So that’s the why.
How To Get Great Photographs In Manual Mode: 6 Easy Steps
Pssst. Hey you. Yeah, you. Come closer: <Looks around> The same way you get to Carnegie Hall: Practice. Okay, that’s a joke, but many a true thing is said in jest. Seriously. Do these things. It absolutely worked for us and we got shots like these in under a month. Are we all of the way there? Hell, no. But we’re mighty gratified by what we’ve learned. This is what it took, and it was fun as all get out.
- RTFM and Practice.
- Take your camera with you.
- Take a lot of photographs.
- Download your images from your card to your hard drive and open them.
- Look at them, and if you want to keep them, give them good, descriptive names. File management is crucial.
- Check the exposure triangle in GIMP, see what could be better. (All of that stuff will be listed. Ours says the ExifPhoto.ExposureTime 1/320s, ExifPhoto.ISOSpeedRatings 200. Our aperture can’t be seen; it says “ExifPhoto.Fnumber F0, ExifPhoto.FocalLength 0.0, and ExifPhoto.LensModel Manual Lens No CPU. But yours will show all of your stuff. It looks like this:)
Shoot a lot of photographs. Look at the LCD. Think about what needs to happen to make your image great. This is really important: Have fun. Because this is really fun, and once you start to get what you want, it’s really satisfying.
We can’t tell you how to get great shots, not knowing exactly what and where you are shooting. But within three weeks, if you practice every day, you will know. Don’t worry about how many shots you take. Feel free to look at ’em and delted ’em. Memory is cheap. We recommend you download the contents of your SD card to your computer after every session, clear off your SD card and start again from scratch. A great many of your images will end up in the trash. Be sure to look at them carefully. One thing that helped us a great deal was to shoot in RAW, and open the files with RawTherapee and Gimp. A lot of people argue about that, too. RAW vs JPEG. (RawTherapee and Gimp: two open-source image editors – free, but excellent.) You can play with the exposure which really helped us to think about what we want. Don’t be afraid to throw bad shots away. Go get some better ones. Nobody needs more boring photographs. Sorry.
Conclusion:
We sure hope that you’ve enjoyed this. If you’ve read any of our stuff from Lone Loon Song, then you know that our mission is to get out there™ camping with the biggest bang for the smallest buck. (And investment of effort.) One of the best things about camping is recording your adventures in beautiful places with photography. Go to beautiful places with people that you love. Go there alone. Take your camera, and record your wonderful stuff. Big love, thanks for reading all of this. But this is our article on how to shoot in manual mode with your DSLR second hand camera. So if this sounds like something that you might be interested in, you’re in the right place. If you find this useful, please share this with your friends, link to us, or drop us a line.
Big Love, C the lone loon.
| We test and review outdoor stuff. “Outdoor stuff” is doing a lot of work in this sentence; pretty much anything we are interested in, from backpack coolers to solar panels, to sensor sizes for DSLR cameras. We are driven to get maximum value for the least possible effort, and outlay of cash. None of this is generated by A.I. We know what we’re talking about. This is all either stuff we like or not. We intend to be as honest with you as possible because we want to be useful and earn your trust. If you purchase something through our links, we’d be honoured, but please know that we will earn a commission, at no cost to you. “We’ll tell you nuthin’ but nuthin’ but right, Donny.” Al Pacino in Donny Brasco. |